Recording Secrets For The Small Studio - Additional Resources
Acoustic Guitar
Table of Contents
The following audio examples were recorded with professional guitarist Matt Harvey at London’s renowned Livingston Studios using a set of SE Electronics SE4 end-fire condenser microphones. All the mics were recorded through the resident SSL desk’s mic preamps directly into Pro Tools without any signal processing. The microphones were set up in the main wood-panelled live room of Livingston’s Studio 1, and for each microphone setup we recorded passes with three different guitars: a Taylor (‘Gtr 1’); an Art & Luthiere (‘Gtr 2’); and a Huss & Dalton (‘Gtr 3’).
Multimic Setup 1
This microphone setup used 12 SE Electronics SE4 microphones. Two of the microphones (mics ‘D’ and ‘H’) had omnidirectional capsules fitted, whereas the other ten mics all used a cardioid polar pattern. In addition to recording separate passes for each of the three gutiars, we also recorded a couple of extra passes of the Taylor guitar to show the impact of some DIY acoustics tactics on the miked sound: for the first set of files (‘Reflect’) we placed a number of hard surfaces behind the player to bounce more of the instrument’s rear dispersion back into the mics; and for the second set of files (‘Absorb’) we used absorptive baffles, quilts, and carpets to soak up some of the room’s natural early reflections. These setup variations can be seen in action in the pictures below (left to right: ‘Gtr1’; ‘Reflect’; ‘Absorb’):

To allow easier comparisons, I’ll present the mic signals from Multimic Setup 1 in smaller groups, each with its own diagram and audio-files table.
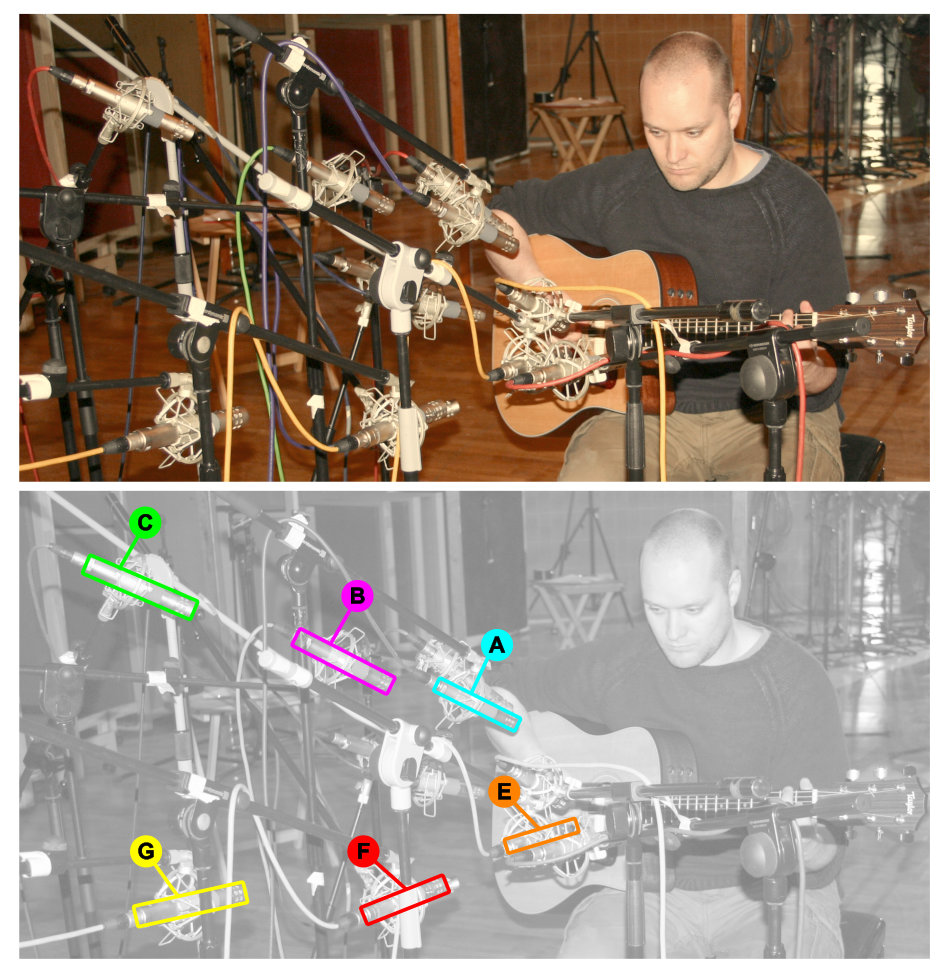
- Miking Distance: These examples show how miking distance affects the timbre captured via a cardioid microphone when addressing the guitar from two common miking angles.
| Mic | Gtr 1 | Gtr 1 Reflect | Gtr 1 Absorb | Gtr 2 | Gtr 3 | Polar Pattern | Distance | Position/Angle |
|---|---|---|---|---|---|---|---|---|
| A | WAV/MP3play_arrow | WAV/MP3play_arrow | WAV/MP3play_arrow | WAV/MP3play_arrow | WAV/MP3play_arrow | Cardioid | 20cm | A little above the level of the strings, angled slightly downwards towards a point just above the sound-hole |
| B | WAV/MP3play_arrow | WAV/MP3play_arrow | WAV/MP3play_arrow | WAV/MP3play_arrow | WAV/MP3play_arrow | 45cm | ||
| C | WAV/MP3play_arrow | WAV/MP3play_arrow | WAV/MP3play_arrow | WAV/MP3play_arrow | WAV/MP3play_arrow | 90cm | ||
| E | WAV/MP3play_arrow | WAV/MP3play_arrow | WAV/MP3play_arrow | WAV/MP3play_arrow | WAV/MP3play_arrow | 20cm | On the level of the fretboard, angled slightly inwards towards the 12th fret | |
| F | WAV/MP3play_arrow | WAV/MP3play_arrow | WAV/MP3play_arrow | WAV/MP3play_arrow | WAV/MP3play_arrow | 45cm | ||
| G | WAV/MP3play_arrow | WAV/MP3play_arrow | WAV/MP3play_arrow | WAV/MP3play_arrow | WAV/MP3play_arrow | 90cm |
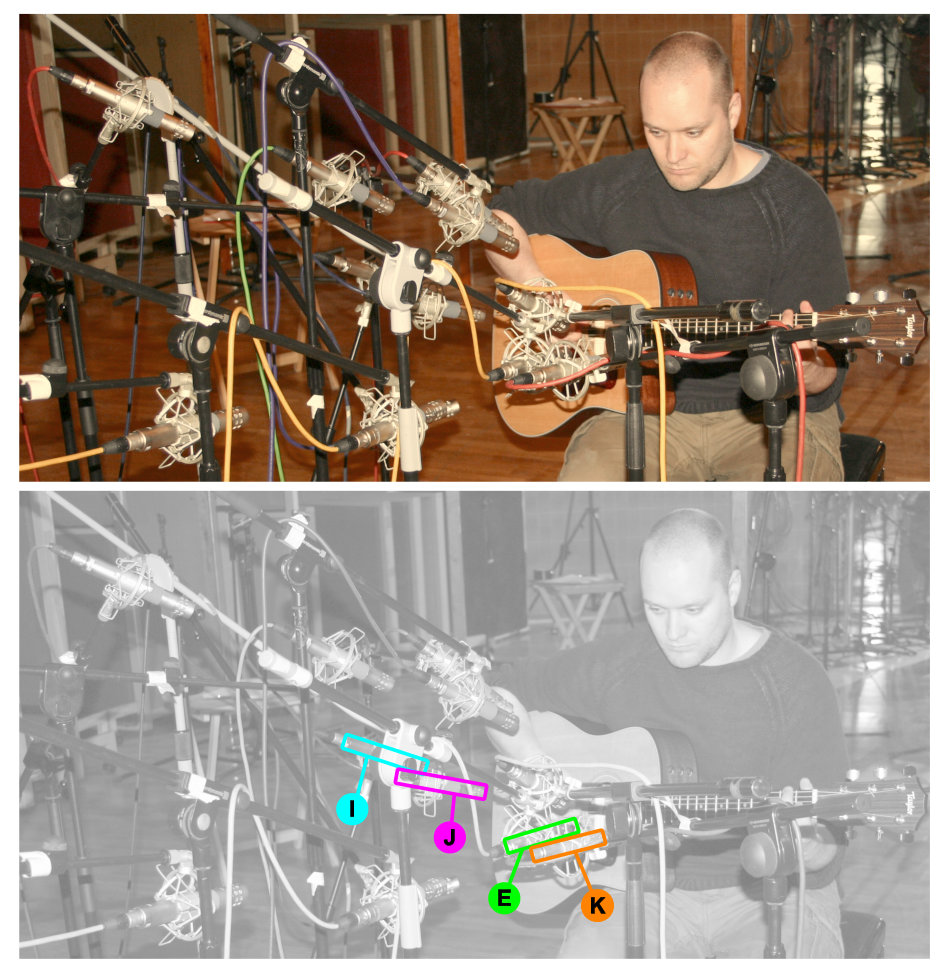
- Spotlight Sweep (Horizontal): In these examples, a cardioid close mic is swept across the guitar horizontally (from bridge to frets) to show how different regions of the instrument produce different timbres.
| Mic | Gtr 1 | Gtr 1 Reflect | Gtr 1 Absorb | Gtr 2 | Gtr 3 | Polar Pattern | Distance | Position/Angle |
|---|---|---|---|---|---|---|---|---|
| I | WAV/MP3play_arrow | WAV/MP3play_arrow | WAV/MP3play_arrow | WAV/MP3play_arrow | WAV/MP3play_arrow | Cardioid | 20cm | On the level of the fretboard, angled slightly inwards towards the bridge |
| J | WAV/MP3play_arrow | WAV/MP3play_arrow | WAV/MP3play_arrow | WAV/MP3play_arrow | WAV/MP3play_arrow | On the level of the fretboard, directly in front of the sound-hole | ||
| E | WAV/MP3play_arrow | WAV/MP3play_arrow | WAV/MP3play_arrow | WAV/MP3play_arrow | WAV/MP3play_arrow | On the level of the fretboard, angled slightly inwards towards the 12th fret | ||
| K | WAV/MP3play_arrow | WAV/MP3play_arrow | WAV/MP3play_arrow | WAV/MP3play_arrow | WAV/MP3play_arrow | On the level of the fretboard, directly in front of the 5th fret |
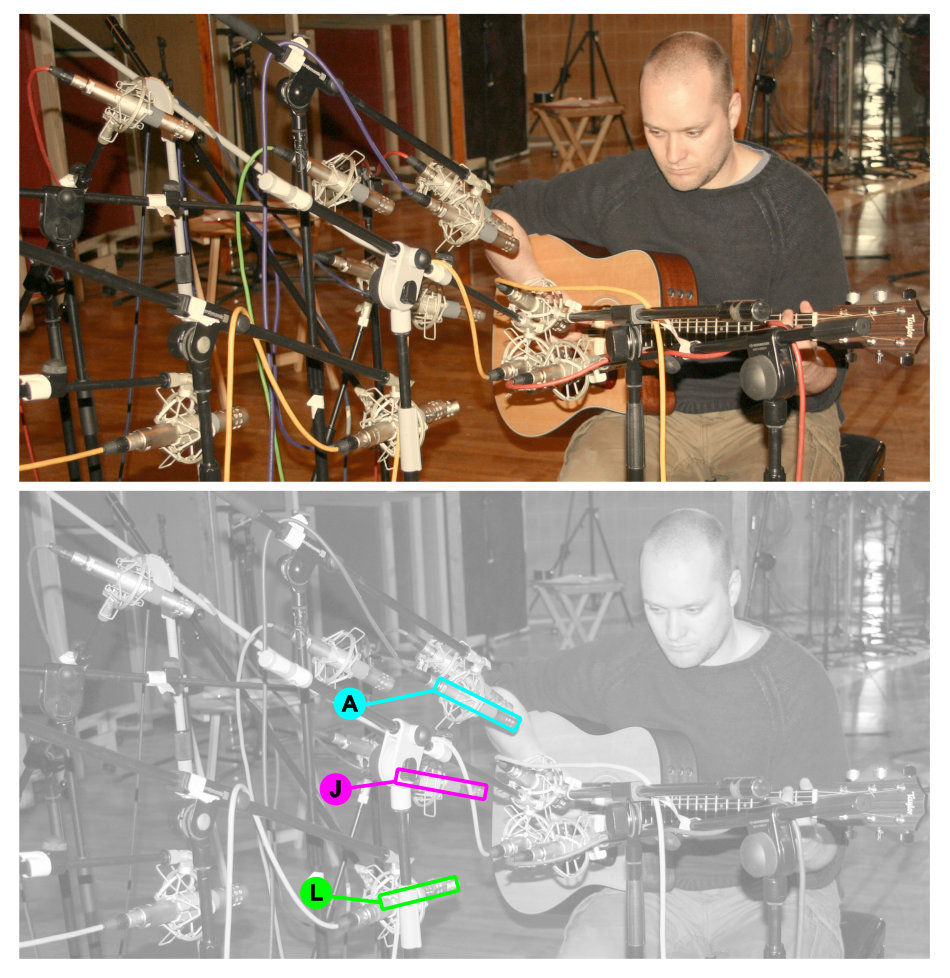
- Spotlight Sweep (Vertical): In these examples, a cardioid close mic is swept across the guitar vertically in front of the guitar’s sound-hole to show how the timbral balance changes.
| Mic | Gtr 1 | Gtr 1 Reflect | Gtr 1 Absorb | Gtr 2 | Gtr 3 | Polar Pattern | Distance | Position/Angle |
|---|---|---|---|---|---|---|---|---|
| A | WAV/MP3play_arrow | WAV/MP3play_arrow | WAV/MP3play_arrow | WAV/MP3play_arrow | WAV/MP3play_arrow | Cardioid | 20cm | A little above the level of the strings, angled slightly downwards towards a point just above the sound-hole |
| J | WAV/MP3play_arrow | WAV/MP3play_arrow | WAV/MP3play_arrow | WAV/MP3play_arrow | WAV/MP3play_arrow | On the level of the fretboard, directly in front of the sound-hole | ||
| L | WAV/MP3play_arrow | WAV/MP3play_arrow | WAV/MP3play_arrow | WAV/MP3play_arrow | WAV/MP3play_arrow | A little below the level of the strings, angled slightly upwards towards a point just below the sound-hole |
- Cardioid Versus Omni For Close-miking: These examples show how the captured sound in two common close-miking positions changes depending upon whether you use a cardioid or an omnidirectional polar pattern.
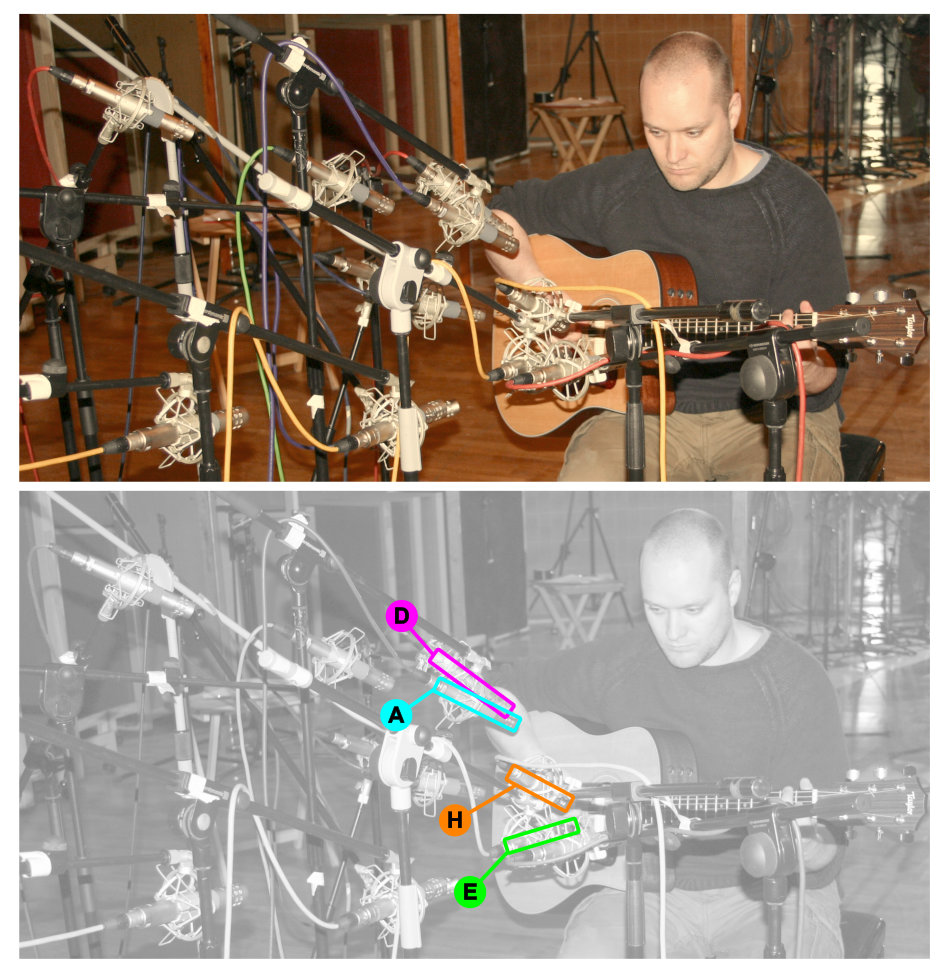
| Mic | Gtr 1 | Gtr 1 Reflect | Gtr 1 Absorb | Gtr 2 | Gtr 3 | Polar Pattern | Distance | Position/Angle |
|---|---|---|---|---|---|---|---|---|
| A | WAV/MP3play_arrow | WAV/MP3play_arrow | WAV/MP3play_arrow | WAV/MP3play_arrow | WAV/MP3play_arrow | Cardioid | 20cm | A little above the level of the strings, angled slightly downwards towards a point just above the sound-hole |
| D | WAV/MP3play_arrow | WAV/MP3play_arrow | WAV/MP3play_arrow | WAV/MP3play_arrow | WAV/MP3play_arrow | Omni | ||
| E | WAV/MP3play_arrow | WAV/MP3play_arrow | WAV/MP3play_arrow | WAV/MP3play_arrow | WAV/MP3play_arrow | Cardioid | On the level of the fretboard, angled slightly inwards towards the 12th fret | |
| H | WAV/MP3play_arrow | WAV/MP3play_arrow | WAV/MP3play_arrow | WAV/MP3play_arrow | WAV/MP3play_arrow | Omni |
Multimic Setup 2
This microphone setup used 10 SE Electronics SE4 microphones all with their cardioid capsules fitted. The same three guitars were used, each one being recorded by all 10 mics simultaneously.
- Further Multimiking Options: These files demonstrate a variety of alternative mic positions you might consider when multimiking an acoustic guitar, and I’ve also demonstrated how two of the microphone pairs might be used to generate a bit of stereo spread. To hear the impact that phase relationships can have on a multimiked acoustic-guitar recording, import the WAV files into your DAW system and listen to how each of the tight pattern of mics ‘B’, ‘C’, and ‘D’ combine with any of the other mics.
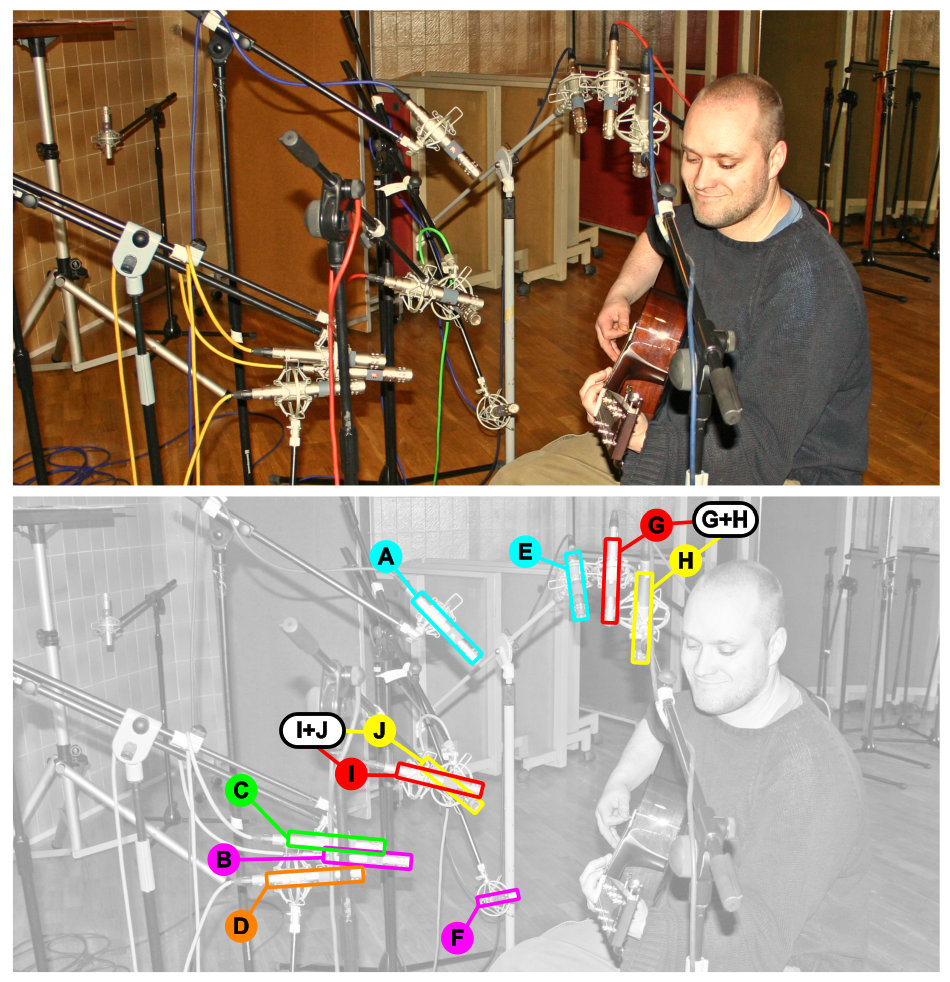
| Mic | Gtr 1 | Gtr 2 | Gtr 3 | Polar Pattern | Distance | Position/Angle |
|---|---|---|---|---|---|---|
| A | WAV/MP3play_arrow | WAV/MP3play_arrow | WAV/MP3play_arrow | Cardioid | 30cm | A little above the level of the strings, angled slightly downwards towards a point just above the sound-hole |
| B | WAV/MP3play_arrow | WAV/MP3play_arrow | WAV/MP3play_arrow | On the level of the fretboard, angled slightly inwards towards the 12th fret | ||
| C | WAV/MP3play_arrow | WAV/MP3play_arrow | WAV/MP3play_arrow | 35cm | ||
| D | WAV/MP3play_arrow | WAV/MP3play_arrow | WAV/MP3play_arrow | 40cm | ||
| E | WAV/MP3play_arrow | WAV/MP3play_arrow | WAV/MP3play_arrow | 30cm | At the tail of the instrument above the level of the fretboard, pointing down towards sound-hole | |
| F | WAV/MP3play_arrow | WAV/MP3play_arrow | WAV/MP3play_arrow | At the tail of the instrument below the level of the fretboard, pointing up towards sound-hole | ||
| G | WAV/MP3play_arrow | WAV/MP3play_arrow | WAV/MP3play_arrow | Above and very slightly in front of the instrument, by the player's left ear (as seen from the audience) | ||
| H | WAV/MP3play_arrow | WAV/MP3play_arrow | WAV/MP3play_arrow | Above and very slightly in front of the instrument, by the player's right ear (as seen from the audience) | ||
| G+H | WAV/MP3play_arrow | WAV/MP3play_arrow | WAV/MP3play_arrow | Mix of mics 'G' and 'H', panned slightly to give a little stereo width | ||
| I | WAV/MP3play_arrow | WAV/MP3play_arrow | WAV/MP3play_arrow | In front of the guitar's 12th fret, pointing towards the sound-hole | ||
| J | WAV/MP3play_arrow | WAV/MP3play_arrow | WAV/MP3play_arrow | In front of the guitar's 12th fret, pointing towards the 5th fret | ||
| I+J | WAV/MP3play_arrow | WAV/MP3play_arrow | WAV/MP3play_arrow | Mix of mics 'I' and 'J', panned slightly to give a little stereo width |
Further Reading
- To read more about recording and mixing acoustic guitar, check out this Sound On Sound magazine article, to which the above audio examples directly relate.

